
The ten essentials for a succulent front yard aren’t difficult to achieve yet make a big difference. They’re illustrated below by designer Deana Rae McMillion‘s own makeover-to-maturity story. When she transformed her bland lawn into a dazzling succulent garden a few years ago, it looked great immediately after installation, earned a city beautification award, and continues to look better and better. The location is Carpinteria, CA, south of Santa Barbara, a mile inland from the ocean.
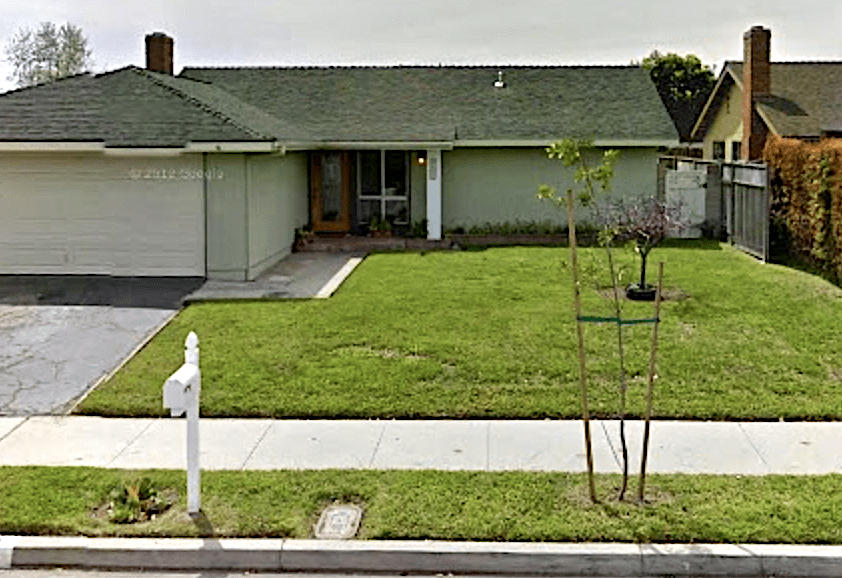
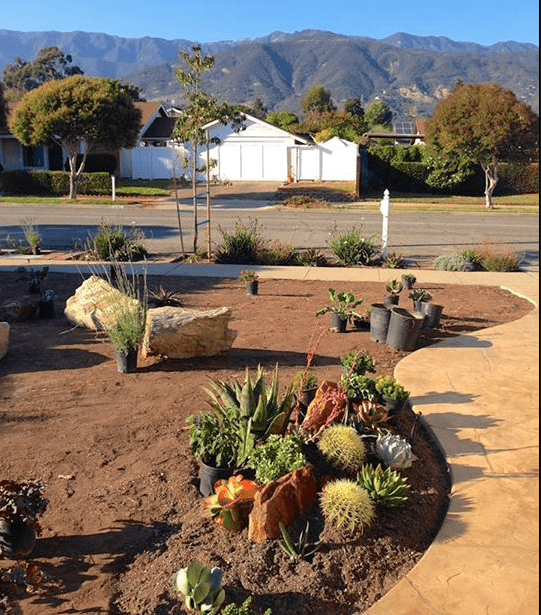
BEFORE As viewed from the street, the McMillions’ 1970s house was all straight lines and rectangles defined by a nondescript driveway, garage, concrete walkway, parkway strip, sidewalk, fence, and lawn.
AFTER: The garden newly installed (Aug., 2015) and at yearly intervals: July 2016, July 2017 and August, 2018.
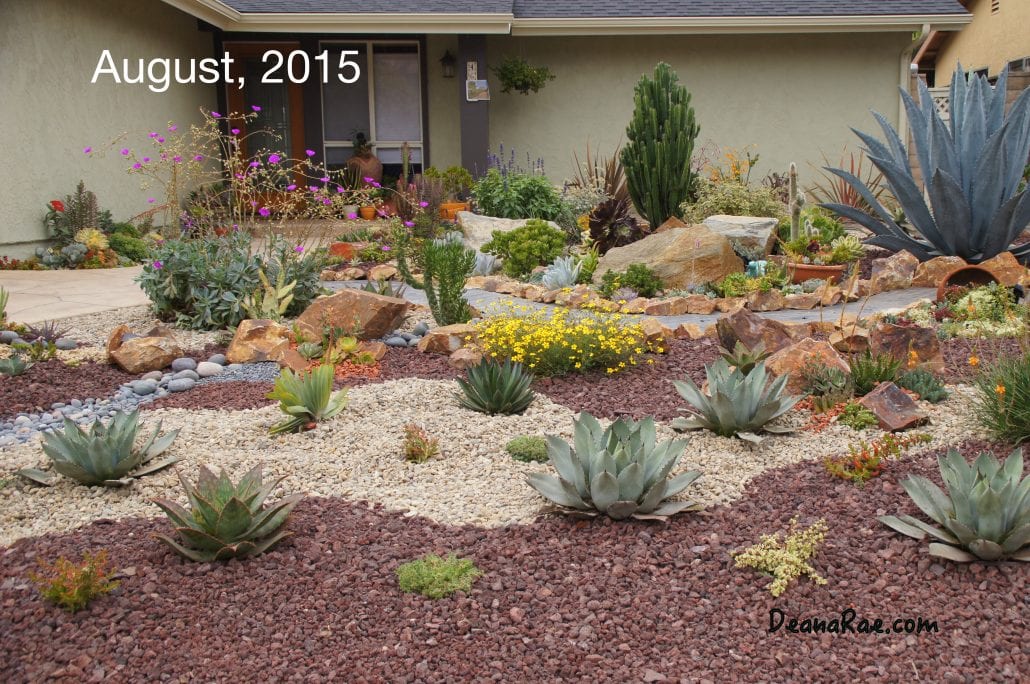

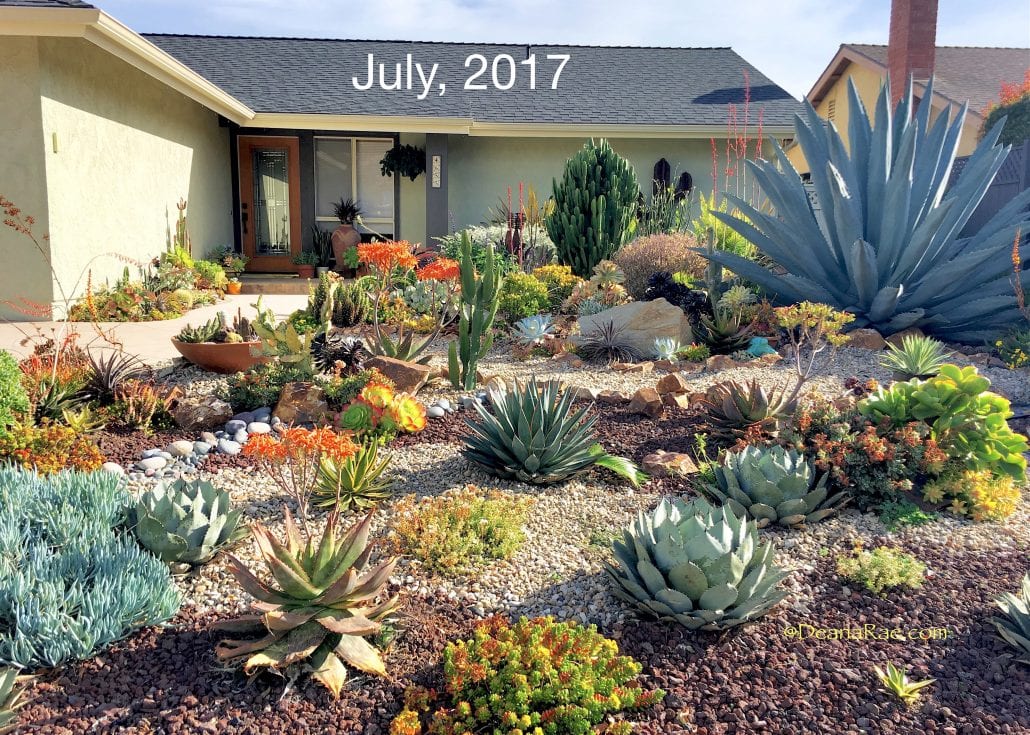
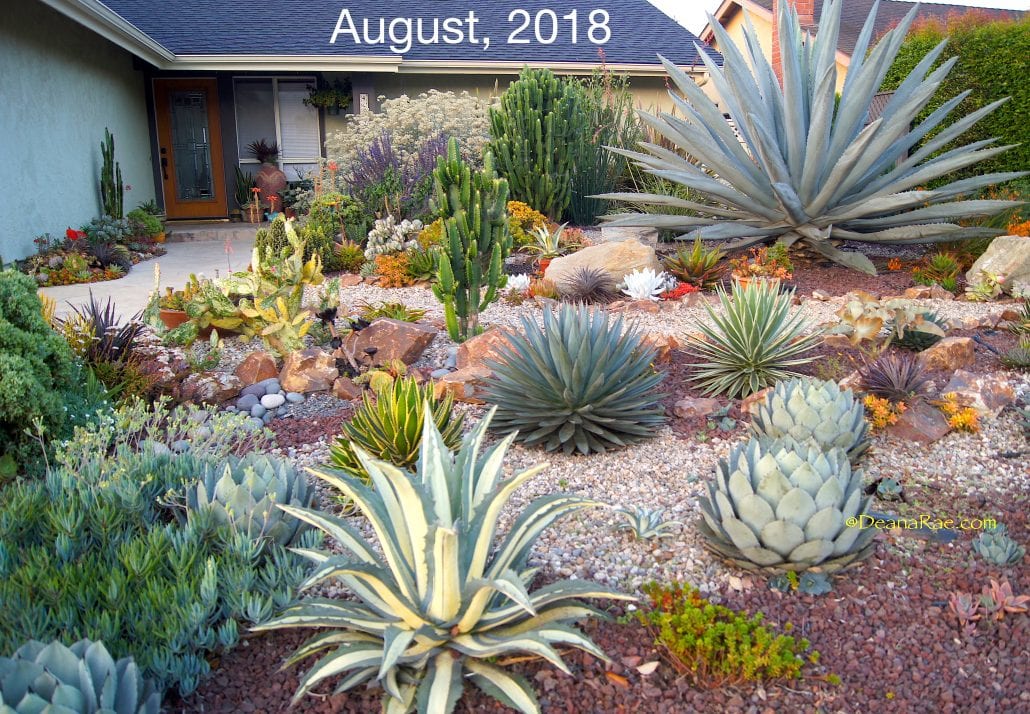
In 2012, a year after she and her husband moved in, Deana Rae cut out a small area of the lawn and experimented with succulents. They did well, and an Agave americana quickly attained several feet in height and diameter. Notice how it (the big blue century plant at upper right) has enlarged over time and become a dramatic focal point that visually balances the “weight” of the house (i.e. the prominent garage).
Succulent Essential #1: Know how large plants will get. For example, Agave americana, though easy to grow and often free for the asking, isn’t for every garden. (See my video, “What You MUST Know About Century Plants.”)
After the sod was cut out and removed, Deana Rae installed pocket gardens (inspired by San Diego succulent landscape designer Laura Eubanks) along the new front walkway.
#2: Collect succulent cuttings from friends, neighbors and fellow garden club members. If cuttings are not going in the ground right away, get them started in pots. Free plants!
#3: If soil is compacted and difficult to dig, give succulent roots a fighting chance by spading and amending prior to planting.
#4: Bring in large boulders to lend interest and definition to the overall design. They weigh tons, so have them delivered and positioned BEFORE you plant.
#5: Don’t skip pre-installation steps like adding irrigation, evaluating runoff, repairing drains and walls, and improving hardscape.
#6: Design with curved lines for a natural look. Straight lines and rows are more formal, seldom found in nature, and tend to emphasize a home’s linear architecture.
#7: Position complex plantings where they’ll be seen and enjoyed up close. Viewpoints that are broader and farther away need less detail and larger plants.
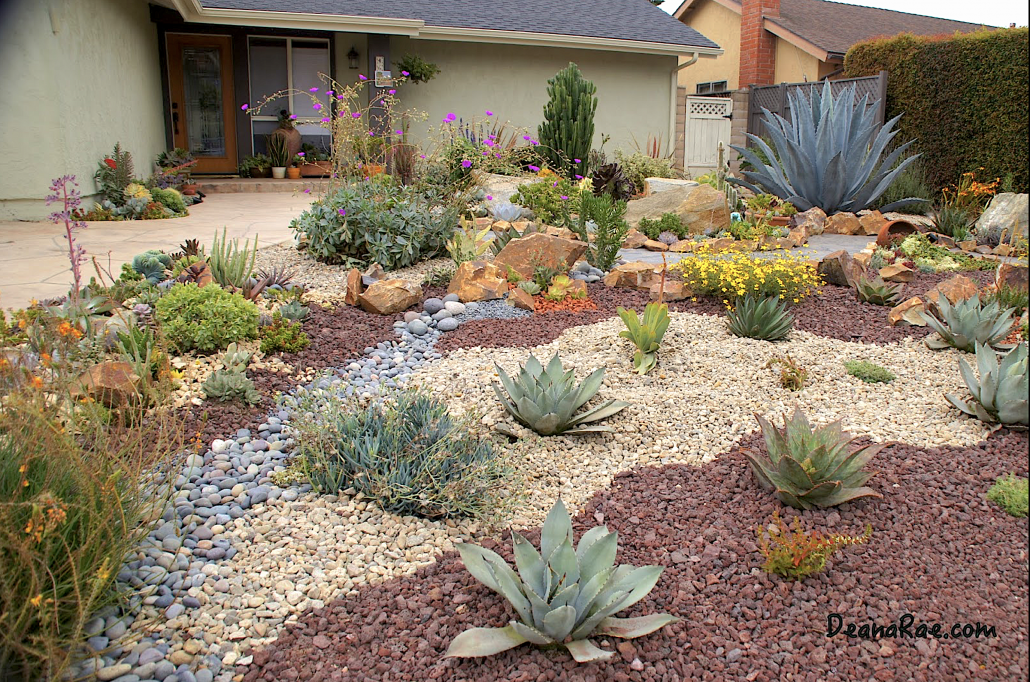
Deana Rae’s plant choices include medium-sized agaves, aloes, calandrinia (with purple flowers), bulbine (orange flowers), blue Senecio mandraliscae, and drought-tolerant perennials such as yellow sundrops (Calylophus sp.). A dry creek bed of river cobbles funnels rainwater into the garden. Small succulents such as jades, aeoniums, echeverias and sedums—all started from cuttings—nestle around boulders.
#8: Rock topdressings make a BIG difference. Imagine this garden with only bare dirt between plants. Topdressing finishes a garden aesthetically; adds interest, color and texture; makes weeds easy to pull; moderates soil temperature; and slows moisture evaporation. “I had so much fun shopping for rocks and gravel,” Deana Rae says. “I think I love rocks as much as I do succulents.”
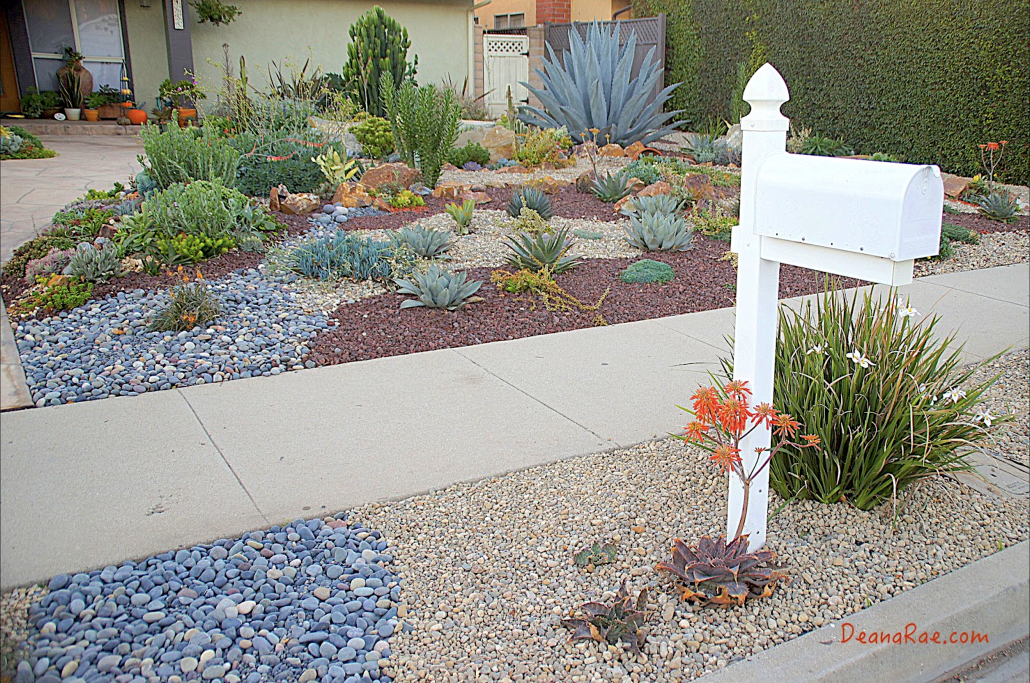
Aloe maculata (in bloom) is tough as nails and its offsets are often free for the asking. It’s one of the few succulents that’s invasive in friable soil, but in a parkway strip like this, it can’t get into trouble. In fact, as it spreads, it’ll make the the area look even better. The fortnight lily at right was well established, so it stayed.
#9: Continue rocks into the parkway strip. This enhances the overall design, makes the front yard larger, and provides a “hell strip” that’s easy to maintain.
#10: Include vignettes: Intriguing plant-and-rock combos within a larger setting. This is optional, but it’s a great way to express your creativity, enjoy the garden hands-on, and provide delightful discoveries for visitors. Some examples:
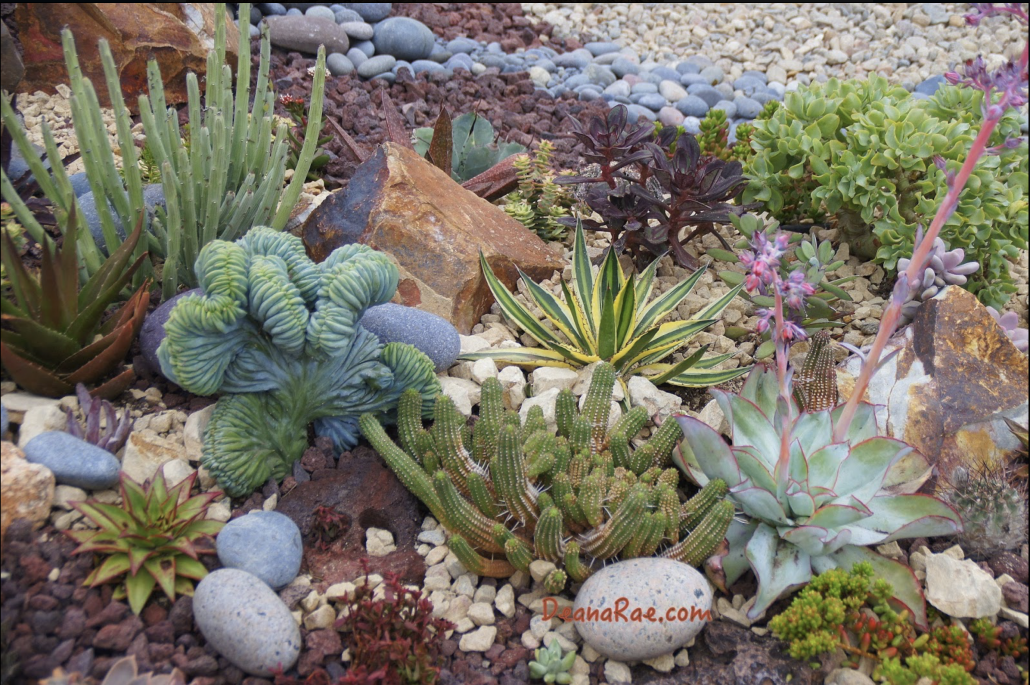
Dagger-leaved Agave lophantha ‘Quadricolor’ (center) contrasts with curvy ripple jade (upper right), Euphorbia mammilaris (lower middle) and a crested myrtillocactus (center left). Echoing the agave’s pointed, upthrusting lines are Echeveria subrigida ‘Fire and Ice’ (lower right, in bloom), Echeveria agavoides ‘Lipstick’ at lower left, and aloes.
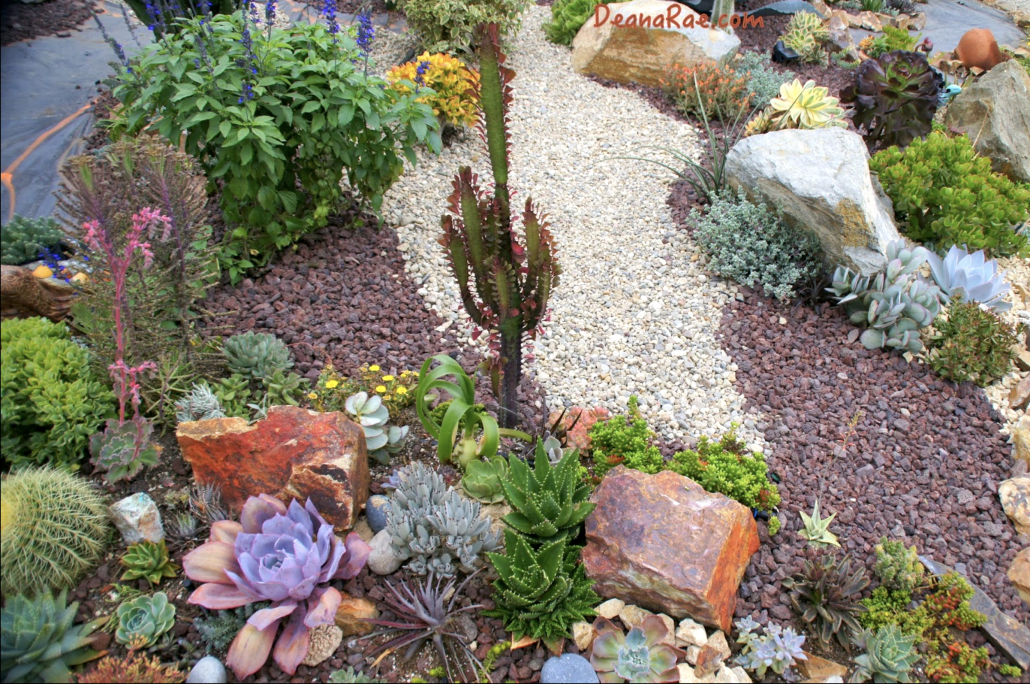
Gravels that flow through the garden suggest movement, contrast and repeat colors of succulents, and provide access to planted areas. Statuesque Euphorbia trigona ‘Rubra’ serves as a focal point that will grow much larger over time. An eclectic mix of small succulents includes echeverias, aloes, kalanchoes, sedums, crassulas and barrel cactus. A low-water salvia in bloom (upper left) lends floral color and a mounding, soft-textured backdrop.

A ceramic turtle adds whimsy and repeats the color and shape of a cluster of turquoise echeverias. It’s fine to add a planted pot to a garden, like the wide terracotta bowl at left (with Crassula ‘Mini Jade’, Kalanchoe luciae and Portulacaria afra ‘Variegata’). Lampranthus deltoides at upper left extends the blue and lends frothy texture. Aeoniums, sedums and aloes complete the composition.
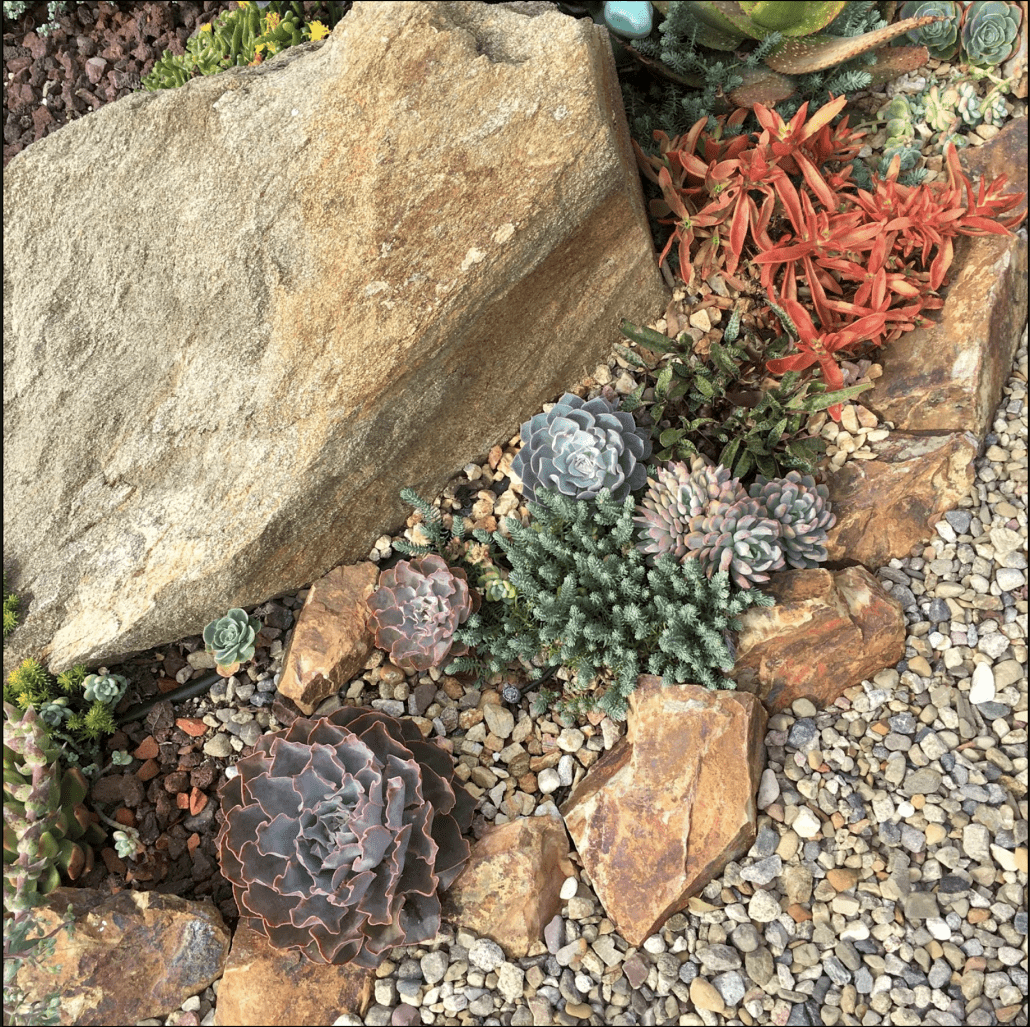
A sheltered niche amid rocks is a great spot for echeverias, which can be tricky to grow in the open garden and normally do best in pots. Amid them are Sedum ‘Blue Spruce’, silver squill (Ledebouria socialis), and orangy-red Crassula ‘Campfire’.
Related info on this site:
The post Ten Succulent Front Yard Essentials appeared first on Succulents and Succulent Garden Design | Debra Lee Baldwin.
from Succulents and Succulent Garden Design | Debra Lee Baldwin https://ift.tt/2LWVF1C
via IFTTT
No hay comentarios:
Publicar un comentario