martes, 23 de noviembre de 2021

Create a Wall Christmas Card Tree Amazing tips

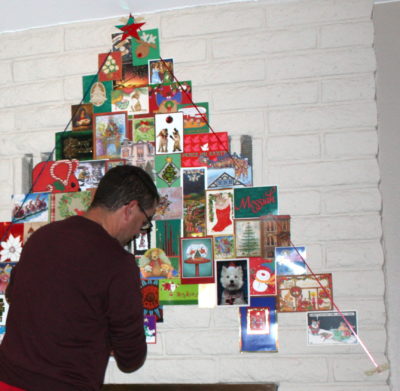
A wall Christmas card tree takes up no floor space and is as engaging as any 3-D tree.

For my family, creating a Christmas card tree is an annual event. It's a tradition I started decades ago. Guests express surprise that we receive so many cards. We don't, really. Some date to the '70s!

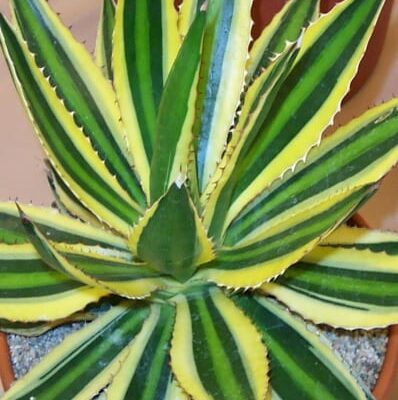
Not enough Christmas cards?

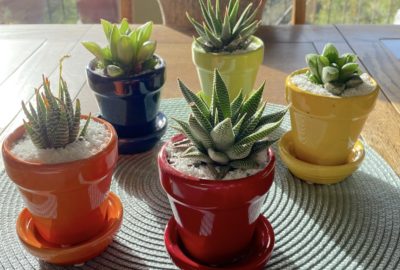
Well! You might combine succulents and the holidays by making a tree of cards from my "Succulent Chic" Zazzle store. (Send me a photo if you do!) Here's one example:

Succulent sleigh greeting card (c) Debra Lee Baldwin

Additional ideas:

  • Use rectangles and circles cut from wrapping paper. Glue onto heavy paper so they don't curl.
  • Buy several assortments of inexpensive holiday cards (affiliate link). For about $40 you'll have plenty.
  • Do a tree-shaped photo collage that celebrates the year's memorable occasions.
  • Ask Mom and Grandma if you can put holiday cards they've been saving to good use.

What about ornaments?

I gave most of my keepsake ornaments to my DIL, who does a traditional tree. Even so, I sometimes can't resist a bespangled ball. I display such lovelies in a large glass apothecary jar or in a wide, shallow bowl.

Ornaments in a star bowl

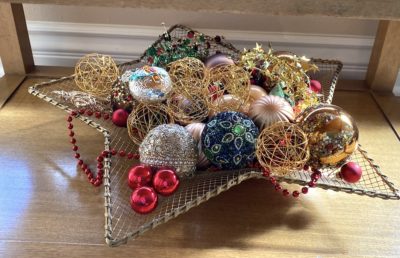
Ornaments in a star-shaped mesh bowl

Card Tree Tools and Materials

You'll need...

  • String to outline the card tree's triangle
  • Masking tape. Use heavy-duty if the wall surface isn't smooth.
  • Scissors to cut cards at the fold. You'll only need the front, and if uncut they're too heavy and hang open.
  • Stepladder (optional). Depends how high you have to reach.
  • Cards. It's hard to estimate the quanitity, but FYI our tree measures 70 inches on each side and takes 80-90 cards.
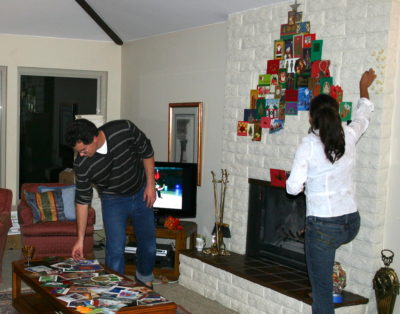
Card Tree Assembly

Christmas card tree on wall (c) Debra Lee Baldwin)

Begin by outlining an equilateral triangle with ribbon or string tacked or taped in place.

  • Lay out previous years' cards for approval. "I need a vertical," my son will say, glancing at us lazy spectators over his shoulder.
  • No star for the top? Cut one from a card.
  • Extend upper corners of outermost cards beyond the string to give the tree a stair-step edge. How far? Figure half the width of the card or simply eyeball it.
  • Cards can---and should---slightly overlap.
  • Small cards mostly (but not necessarily) go at the top; larger ones, farther down.
  • Help whomever's doing the assembly by rolling one- to two-inch pieces of masking tape. Each card needs three or four rolled bits of tape to secure it.
  • Tape cards to the wall, not to each other.
  • Place cards parallel to walls and ceiling.
  • Remove the string when you're done.
Wall Christmas card tree assembly (c) Debra Lee Baldwin

Note rolled pieces of masking tape at upper right.

Enhance the experience

We light a fire in the fireplace, put a holiday video on the TV or listen to Christmas music, have hot cocoa or mulled cider, light pine-scented candles, and set out snacks.

Much of the fun is evaluating cards that come in the mail for "card tree potential." We also read friends' holiday letters and give priority to cards with sentimental value. But the best part is looking at photos of past card trees that show kids growing up.

How long does a card tree take?

Figure about a minute per card. This year's card tree, at top, took about 1-1/2 hours.
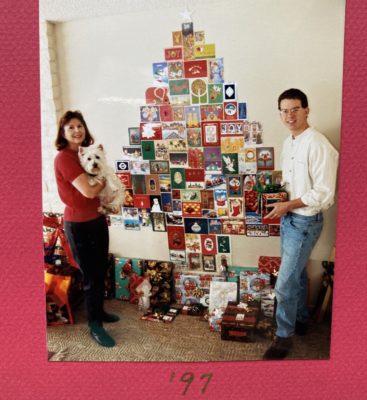
When it's finished

Pose people with it. I sometimes turn card tree photos into personal greeting cards or tuck copies into holiday cards.

Card tree storage chest

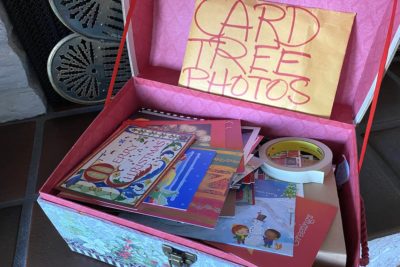
Our card tree storage chest takes up a lot less room than a fake tree.

Be sure to put one in an envelope big enough to hold additional photos. Write the year on the photo and keep the envelope with cards you'll use next year.

Wall Christmas Card tree (c) Debra Lee Baldwin

Trust me, you don't want to try to figure out the year a decade later.

Shop holiday sales. Gorgeous Christmas cards often go for 50% off. The more bling the better. I personally like those with rhinestones.

If you're not already doing so, save colorful greeting cards that come in the mail.

I'd love to know what you think. I welcome your comments and questions below. Happy holidays!

The post Create a Wall Christmas Card Tree appeared first on Debra Lee Baldwin. Copyright © Debra Lee Baldwin.


from Debra Lee Baldwin https://ift.tt/32hSmuC
via IFTTT

jueves, 11 de noviembre de 2021

Plant a Succulent Grid in a Shallow Circular Pot Amazing tips

When I saw succulents planted in grid patterns in shallow, circular pots, I just had to show them to you. Here and in my new video, you'll discover how to make similar planters for your own garden.

I spotted them at The Well, a high-end boutique specializing in outdoor furniture and accessories. It's in Summerland, CA near Montecito where Oprah and the royals have large estates.

Willy Guhl pot w echeverias

Willy Guhl pot with echeverias at The Well

I envisioned lavish poolside patios graced with The Well's understated, sophisticated and functional outdoor art...especially these large shallow cement pots planted criss-cross with succulents.

Echeverias in a Willy Guhl cement pot

Echeverias in a Willy Guhl cement pot

Eek! They cost $2,500!

It seems that such hefty Midcentury pots by Swiss designer and artist, the late Willy Guhl, are prized collector’s items. Those two feet or more in diameter can go for upwards of $2,500---and that's unplanted! I didn't love the price, but I did love the look.

After I got home, I realized I had a similar-sized pot from a garage sale. It was free because they were happy to get rid of it. It’s lightweight, probably fiberglas. I did some checking, and comparable ones average around $100 online.

Concrete-look resin planter (c) Debra Lee Baldwin

I dabbed my resin pot with gray paint to make it look like concrete

Well then! We simply have to make a similar succulent planter, don't we? My goal was to create one that resembled those at The Well yet cost less than ten percent.

Here's how...

Materials

  • Large (2-foot diameter) shallow synthetic pot. Give it a drain hole if it doesn't have one. On Ebay, search "large outdoor resin bowl planter." At Amazon (affiliate links):  https://amzn.to/3C31xLA
  • Succulents: Echeverias or sempervivums are good choices because they're symmetrical and keep their circular shape as they grow. Go with echeverias if you live in a mild climate; semps if you get below-freezing temps in winter.

I chose blue Echeveria 'Alegra' from Oasis Water Efficient Gardens nursery near me in Escondido, CA. Pot size: 3.5 inches. Plant diameter: 4 to 5 inches. I estimated I'd need 21 but got 24 just in case. Order online.

Wide shallow resin pot

I used Echeveria 'Allegra' in 3.5-inch pots for my 21-in diameter pot

  • Gray paint (optional). After cleaning my weathered white pot, I dabbed the outside with gray acrylic paint to make it look like cement.
  • Potting soil: Any will do. I used Bonsai Jack, a coarse mix that doubles as a topdressing.
  • Lazy susan (optional). I like being able to rotate a large pot while planting it.

Method (in video)

  • Fill the pot with soil to one inch below the rim.
  • At the midpoint, plant a rosette so its crown is about even with the rim of the pot. (A plant's crown is just above the soil, where stem and roots meet.)
  • Create a plus sign with plants that extends to the rim of the pot. Mine consists of two echeverias on four sides, for a total of 9.
Faux-concrete succulent grid planter (c) Debra Lee Baldwin

Here's my finished faux-concrete succulent grid planter. I love that I can slide it (concrete would be way too heavy).

  • Fill in the corners, adjusting plants as needed to make a grid.
  • Add topdressing: more Bonsai Jack potting mix, pebbles or crushed rock to conceal bare dirt and give the composition a finished look.
Succulents in a grid w holiday balls (c) Debra Lee Baldwin

Little red holiday balls make mine look like a big dessert

How many plants do you need?

Cut a paper circle the size of your pot’s inside top diameter. Fold the circle in quarters to pinpoint its center. At the nursery, put the paper on the ground and place small potted succulents on top, as you'll plant them: from the center outward.

How many succulents do you need

20" diameter pot = 37 plants in 2" pots

What if you’re ordering plants online? Cut paper circles or squares the size of the nursery pots, and set those on the paper circle.

How many succulents for a circular pot

12” diameter pot = 21 plants in 2” pots

Find a similar terra-cotta pot on Amazon.

Tell me what you think!

Do you love these designs? Aren't sure? Have I inspired you to make something similar? I welcome your questions and comments below!


Related info on this site

Floral style succulent arrangement (c) Debra Lee Baldwin

Echeveria Info, Photos & Varieties

Echeveria Info, Photos & Varieties How to grow echeverias perfectly, plus an extensive gallery, all ID’d See All Succulent Types Aeonium Agaves Aloes Cactus Crassula Echeveria Euphorbias Ice Plants Kalanchoe Portulacaria Senecio About Echeverias Here you’ll find expert advice to help you grow echeverias perfectly, with a gallery of 150+ beautiful, notable species and cultivars.…

Succulent Container Garden (c) Debra Lee Baldwin

Succulent Container Design

Succulent Container Design Design ideas and must-dos for beautiful, easy-care potted succulents Succulent Container Gardens, How-To Discover My Online Design Class! New! How to Group and Display Potted Succulents (9:48) DIY Floral-Style Succulent Centerpiece Learn About My Online Class! This lush and colorful succulent combo in a pedestal pot looks difficult, but it’s simple once…

The post Plant a Succulent Grid in a Shallow Circular Pot appeared first on Debra Lee Baldwin. Copyright © Debra Lee Baldwin.


from Debra Lee Baldwin https://ift.tt/3C1n3AA
via IFTTT

martes, 2 de noviembre de 2021

Water pH for Succulents Amazing tips

Giving succulents water with the wrong pH can inhibit the plants' ability to take up nutrients, leading to less vigorous growth and yellowing. Urban and residential water tends to be alkaline, meaning it has a pH higher than 7, which is neutral.

Minerals optimally accessed in slightly acidic soil include nitrogen, phosphorus, potassium, sulfur, calcium, magnesium, iron, and manganese.

Rainwater is slightly acidic, which is why a few days after a storm, your succulents (all your plants for that matter) look amazing.

Aim for 5.5 to 6.5

During a recent Cactus & Succulent Society webinar, Ernesto Sandoval advised that the proper pH for watering succulents is approximately 5.5 to 6.5 (slightly acidic). Ernesto, manager of UC Davis' Botanical Conservatory, is renowned for his knowledge about growing succulents, their root development, ideal soil mixes and more.

Acidify the water

The pH of residential water and its mineral content varies by region. If yours has a high mineral content (typical of San Diego), add 2 tablespoons of vinegar per gallon of water. If your water is low in minerals (typical of Davis west of Sacramento), add one T per gallon.

Test to be sure

pH meter

pH meter

Check your water with a pH meter. At about $13, a pH meter provides inexpensive peace of mind. Plus you can use it to test other liquids, including your drinking water, pool or aquarium.

Even better: Citric Acid

Citric acid

Citric acid

Also, for a gentler alternative to vinegar, use citric acid (about $15 for a 2-pound bag). Affiliate links.

Related Info on this site

How to Water Succulents

How to Water Succulents For succulents in the garden, in containers, and if there’s no drainage It really is this simple ~ Aim to keep soil about as moist as a wrung-out sponge. Watering about once a week in summer and once a month in winter should do it. Water thoroughly to soak the roots and…

Rain on agave (c) Debra Lee Baldwin

How Rain Benefits Succulents

Here’s how rain benefits succulents: It provides dissolved minerals and washes away dust that inhibits photosynthesis; it dilutes and flushes salts and harmful chemicals that have built up in the soil from tap water; and it provides nitrogen essential to growth,

The post Water pH for Succulents appeared first on Debra Lee Baldwin. Copyright © Debra Lee Baldwin.


from Debra Lee Baldwin https://ift.tt/3EIGzDN
via IFTTT

lunes, 25 de octubre de 2021

Succulents and Rain, What You Need to Know Amazing tips

Rain at last!

On the bright side, rain makes our gardens look glorious. Ideal conditions for succulents are good drainage, annual rainfall less than 20 or 25 inches, low humidity, and temperatures above freezing.

Here's what you need to know about getting succulents through a wet winter, including the essentials about frost, hail and rot.

After rainstorms, check for:

-- Succulents with rotted leaves. Remove mushy leaves before rot spreads to the plant's stem or crown. 

-- Drainage issues. If soil stays sodden and muddy areas remain long after a storm, roots may drown. Move plants to high ground, and install French drains.

-- Slope erosion. Create dams of rocks and diversion channels, and add gravel or mulch to diffuse the rain's impact.

-- Stagnant water. Check pots, bins and barrels. If they've filled, dump the water before mosquitos find it and breed.

-- Weeds. Wherever soil is exposed to sun, weeds WILL sprout. Get them when small. All too soon they'll have deep roots, go to seed, and look you in the eye.

-- Seepage. Check your home’s basement. Mine used to have an inch or two of standing water whenever the ground became saturated during storms. A few years ago, a friend suggested a simple solution: Coat the concrete blocks that form the basement’s walls with a special paint that prevents seepage. Works great. Any home improvement store carries it.

-- Shop for plants.  Now’s a good time to accumulate plants you want to add to your garden. Rain-soaked ground is soft and easy to dig. Early spring is the best time to establish new plants, after all danger of frost has passed (here in Southern CA, that’s mid-March). Plants will take off in spring and won’t have to contend with summer heat while putting down roots. Don't delay; if your garden is like mine, when the soil dries, it’ll be as hard as concrete.

-- Take photos as what-to-do reminders. When the weather clears, such issues are easy to forget.

The bottom line: Succulents are opportunistic when it comes to rain. Given adequate drainage and frost protection, they  love it!

Related VIDEOS

See how I cope with less-than-ideal winter weather in my own Zone 9b garden, and evaluate its impact on my succulents.

Why Succulents Rot and How to Prevent It

Roots that drown are eaten by bacteria and fungus that move upward into the body of the succulent, causing its tissue to collapse. Is this due to too much rain? Can the plant be saved? Find out!

The Squish Test for Succulents

Worried your succulents are overwatered? Here's how I test and rescue succulents after rainstorms. Even if soft and squishy means rot, it's not always too late.

Post-Rain Must-Do's for Succulent Gardens

Have you checked your succulent garden after the rainstorms? I found a few things that needed taking care of and I bet you will, too!

Protect Your Succulents from Frost

Cover your succulents if overnight temperatures drop below 32 degrees F. Here's how I do it in my own Zone 9b garden.

Related Info on This Site

Rain on agave (c) Debra Lee Baldwin

How Rain Benefits Succulents

Here’s how rain benefits succulents: It provides dissolved minerals and washes away dust that inhibits photosynthesis; it dilutes and flushes salts and harmful chemicals that have built up in the soil from tap water; and it provides nitrogen essential to growth,

Snail on Succulent

Prepare Your Succulents for Rainstorms

During rainy weather, succulents, which come from arid climates, may rot. Stems or trunks turn squishy and collapse. It may be possible to take cuttings from healthy top growth and restart the plants—as I did after one rainy winter with aeoniums. Fortunately, the rest of my succulents came through fine, despite double normal rainfall. After…

Succulents and Too Much Rain, A French Solution

Want to protect your succulents from too much rain? Here’s how the Jardin Zoologique Tropical in southeastern France keeps their succulents from becoming waterlogged during seasonal rainstorms. Corrugated fiberglass panels atop metal bars tent the plants so excess rain doesn’t soak the soil. The structures are tall enough to allow good air circulation, and the panels are translucent, enabling maximum sunlight to reach the plants. The…

Purple cactus in snow

Winter Care for Frost-Tender Succulents

Depending on where you live, here’s how to get frost-tender South African succulents—like crassulas (jades), euphorbias, senecios and aloes—through a North American winter.

The post Succulents and Rain, What You Need to Know appeared first on Debra Lee Baldwin. Copyright © Debra Lee Baldwin.


from Debra Lee Baldwin https://ift.tt/2Zmhj6C
via IFTTT

miércoles, 13 de octubre de 2021

See my Succulent Watercolor Calendar Amazing tips

I'm pleased to announce my 2022 Succulent Watercolor Calendar! It features new, vibrant watercolors based on my favorite photos of succulent plants.

My calendars and other succulent-themed gift items are available from Succulent Chic, my online Zazzle store. I use Zazzle because their production values are high and there’s no overhead, leaving me free to paint and design. Zazzle keeps 90% of the sales price, so it's really just a hobby. But one I love!

Claim your discount

Never pay full price at Zazzle. They offer discounts nearly every day, so be sure to enter the code at check-out (it's at the top of their screen). FYI, if you're purchasing gifts, Zazzle can mail them directly to the recipient for you.

For desert rats, I've also re-released my popular Cactus Calendar, which features photos of symmetrical cacti and those with exceptional character.

Cactus Calendar cover (c) Debra Lee Baldwin

Cactus Calendar cover

See my method

I don't draw the image but rather use a light table (or a bright window) to transfer main lines onto watercolor paper. I made the video to show you how. If I can do it, so can you!

Succulents 2022 calendar

The post See my Succulent Watercolor Calendar appeared first on Debra Lee Baldwin. Copyright © Debra Lee Baldwin.


from Debra Lee Baldwin https://ift.tt/3aBvO9c
via IFTTT

martes, 12 de octubre de 2021

New Must-Have Agave Book Amazing tips

The new book, Agaves: Species, Cultivars & Hybrids by Jeremy Spath and Jeff Moore is a must-have for its images alone. Stunning photos capture the beauty and fierceness of these sculptural succulents in ways both artistic and definitive. It also has comprehensive cultivation info and plant IDs. Plus it's a good read. Both authors are unashamedly---and endearingly---besotted with fanged, fountain-shaped New World plants. Moreover, at $39.95 for 350 pages and 2,000+ images, Agaves is a no-brainer bargain for succulent aficionados.

Nursery owners Jeremy Spath (Hidden Agave) and Jeff Moore (Solana Succulents) have become major players on the succulent scene. This is Jeff's fifth book on succulents, and the first co-authored. Jeremy brings extensive knowledge of the genus and eye-candy photos of species and hybrids; Jeff, per the Preface, "a knowledge of book building and more of a general succulent enthusiast's approach." He's too modest---Jeff's erudite yet easy-going style may be the best part. Both are professional landscape designers with---no surprise---a good eye for color, form and aesthetics. In the interest of transparency, I received a copy to review.

See My Hidden Agave Video

In my earlier video tour of Jeremy's nursery and display gardens, both he and Jeff talk about plants (naturally) as well as the new book.

My only problem...

...with the new Agaves book is deciding which excerpts to share with you. I chose these for their visual appeal and intriguing descriptions. Text below each photo is from the book.

Agave garden by Jeremy Spath (c) Agaves by Jeremy Spath & Jeff Moore

Agave garden by Jeremy Spath

"When the homeowner told Jeremy he was also an agave enthusiast and wanted to go for it, Jeremy almost fell to his knees and wept in gratitude and anticipation."

Agaves at Santa Barbara mission (c) Agaves by Jeremy Spath & Jeff Moore

Agaves at Santa Barbara mission

"Although there were precious few agaves available in the early days of the missions (perhaps Agave americana and/or Agave sisalana had been carried north by then), the newly available species and hybrids shown here look very appropriate."

Agave turns red when dying (c) Agaves by Jeremy Spath & Jeff Moore

Certain agaves may turn red when dying

"In the same way some tree leaves take on warm colors in the fall, when agaves...focus all their remaining energy on the huge inflorescence, the resulting no-longer-needed chlorophyll cells break down, and the underlying warm-colored carotenoid pigments remain...a happy chemical result...sort of like a rainbow."

Imprinting on Agave leaves (c) Agaves by Jeremy Spath & Jeff Moore

Imprinting on Agave leaves

"One of the most endearing traits of some agaves is the phenomenon of imprinting. This fantastic patterning is a result of the leaves being compressed together as they form...resulting in a very artful and eye-pleasing plant...specialized growth [is] similar to fossilized imprints... The fact that it becomes art is a whimsical bonus."

Agave albopilosa (c) Agaves by Jeremy Spath and Jeff Moore

Agave albopilosa

"Outside of Monterrey in Nuevo Leon is a maze of limestone canyons that fan out of the earth. The incredibly steep slate gray walls...are inaccessible without climbing gear---a jet pack would be ideal. [This is] where Agave albopilosa grows. Tufts of hair on the tips of the leaves become saturated with moisture from fog, water then drips down the leaf, feeding the roots.

Agave tequilana (c) Agaves by Jeremy Spath & Jeff Moore

Agave tequilana 'Tequila Sunrise'

"This is the agave of distilled tequila fame...almost everyone, your humble authors included, usually pronounce the name wrong. Most of us say 'tuh- KEEL-ee-ah-nuh', but there is no 'i' after the 'l' - it should be 'tuh-keel-AH-nuh'."

Teeth on agaves (c) Agaves by Jeremy Spath & Jeff Moore

Teeth on agave leaf margins

"Agave edge-spines can somehow be simultaneously threatening, yet stunningly beautiful."

Variegation of agaves (c) Agaves by Jeremy Spath & Jeff Moore

Examples of variegation of agaves

"Variegation...can manifest itself in myriad ways---orderly stripes, haphazard streaking, two- or three-tone variations, or blurry or milky yellows or whites."

Best Way to Get a Copy

As Jeff requests in the video, instead of getting the book from a large distributor (from which he and Jeremy receive very little), "try to buy it from the authors first if you can." Come by either nursery or order from them online.

Jeff Moore, Solana Succulents, 355 N. Hwy 101, Solana Beach, CA; solanasucculents@sbcglobal.net; 858/259-4568.

Jeremy Spath, Hidden Agave Nursery, Escondido, CA (by appointment only); email DeepOceanCurrents@gmail.com.


More on this site

Hidden Agave nursery garden (c) Debra Lee Baldwin

See Hidden Agave Nursery’s Rare Agaves

Hidden Agave Nursery is more than a source of rare and unusual agaves, it’s fast-tracking this popular succulent genus to its full potential. Owner Jeremy Spath specializes in species and cultivars that don’t get overly large, perform well in gardens, and are exceptionally beautiful. I share his fascination with

Agave snout weevil damage (c) Debra Lee Baldwin

Agave Snout Weevil Prevention and Treatment

Agave snout-nosed weevil is a half-inch-long black beetle with a downward-curving proboscis that enables it to pierce an agave’s core, where it lays its eggs. Grubs hatch, consume the agave’s heart, then burrow into the soil to pupate.

Agaves: Uses, Photos, IDs and Varieties

With the exception of a few soft-leaved and variegated varieties, agaves want sun—the more the better in all but desert climates. Most are hardy to the mid- to high-20s F, and some go a lot lower. Sharp points at leaf tips and along leaf edges can make agaves treacherous. I snip about a quarter inch from leaves’ needlelike tips with garden shears.

The post New Must-Have Agave Book appeared first on Debra Lee Baldwin. Copyright © Debra Lee Baldwin.


from Debra Lee Baldwin https://ift.tt/2YO5K8v
via IFTTT

lunes, 4 de octubre de 2021

Succulent Windowsill Pots DIY Amazing tips

In my Succulent Windowsill Pots DIY here and on YouTube, you'll find out how to make a simple, colorful succulent windowsill garden. Whenever you glance out your window at work or home, you'll see and enjoy your living gems.

The six pots in my video, each 3-inches in diameter, came as a set on Amazon. Their rainbow colors make them fun and easy to combine with succulents. I added crushed glass topdressings for color and sparkle.

You needn't use the exact pots I did; other multipot sets work equally well---for example, these from Mountain Crest Gardens. Scroll down to see a video of how and why they're planted with haworthias.

Colorful windowsill succulents (c) Debra Lee Baldwin

Windowsill pots with haworthias, from Mountain Crest Gardens

Materials and Method:

  • Four to six 3-inch decorative pots. Cover drain holes with window screen or paper towels cut in six 2-inch squares, so soil doesn't fall out.
  • The same number of succulents in 2-inch nursery pots. Numerous varieties and even cuttings will work. These are Adromischus cristatus, Sedeveria 'Lilac Mist', Sedeveria 'Letizia', Senecio haworthii, Sedum nussbaumerianum, and Sedum adolphi:
  • Gently slide each plant out of its nursery pot and place in its new pot. If need be, remove 1/4 to 1/2 inch of soil from top or bottom so root ball stays below the rim.
  • Use a gritty potting soil to fill gaps after putting plants (root balls and all) into the pots, to about half inch below the rim.
  • Add a 1/4-inch layer of white or neutral-colored sand (but not beach sand---too salty). The sand will fill gaps and keep the glass topdressing's color true.
  • Add a layer of crushed, tumbled glass (optional) from craft stores, floral suppliers or online. I chose glass in hues that echo the glazes on the pots. Alternatively, conceal bare dirt and give your pots a finished look with crushed rock, pebbles or beads.

Succulent windowsill pots

Care:

  • Water lightly and infrequently, more in summer, less in winter. Aim to keep soil barely moist, never soggy.
  • If your windowsill might be damaged by moisture, move the pots to the sink when watering. Let drain thoroughly before replacing. If need be, cut little circles from foil and place one under each pot to protect the sill from condensation.
  • If stem succulents stretch or rosette succulents flatten, they probably need more light. However, the sun's ultraviolet rays, when magnified by untreated window glass, can burn leaves. If this is a concern, add a sheer curtain or move plants farther from the glass. Keep in mind that south-facing windows typically get the most sun and north-facing the least.
  • It's normal for succulents to get leggy over time. After four to six months or whenever you tire of looking at stems that have growth only on the tips, take cuttings and replant.

Don't miss my DIY video, below, on Mountain Crest Gardens' YouTube channel. It features haworthias in the colorful glazed flowerpots shown earlier:

Related Info on This Site

(c) Debra Lee Baldwin

Contrast Colorful Succulents with Colorful Pots

An important, easy secret for effective plant-pot pairings is to contrast colorful succulents with contrasting, colorful pots. Like glazed pots, succulents come in all colors

Succulent Desk Buddies, DIY

“Desk buddies” are succulents that look good on your desk and require almost no care. They’re cute and classy, and visitors invariably ask about them. All you have to do is dribble water on them twice a month (which also keeps them dusted). Here for your enjoyment is a step-by-step DIY project for creating a…

The post Succulent Windowsill Pots DIY appeared first on Debra Lee Baldwin. Copyright © Debra Lee Baldwin.


from Debra Lee Baldwin https://ift.tt/3a99Hqh
via IFTTT